Screengrab from microscope as it saves a photo from the microscope

Insights

How to (easily) save photos on a microscope

Instead of using workarounds, try a camera microscope if you need to take photos of your work.

Let’s get one thing straight: This is not your usual “How to take a photo through a microscope” tutorial. In fact, in this article we’ll encourage you NOT to take a photo through the microscope, but with the microscope itself. Here’s why.


What usually happens 

Perhaps you’ve already tried to connect a camera to your existing stereo microscope. Or maybe you’ve used a smartphone to take a photo through the ocular before sending it to your e-mail so you can access it on a computer.

If so, you know that it’s a complicated process and that the result isn’t always that good.

TAGARNO PRESTIGE


Why you should use a camera microscope

Instead of this lengthy process, you can do it all with one simple press on the microscope control box.

It of course requires that you have what is called a camera microscope, also referred to as a digital microscope. But don’t worry, being able to easily take photos of your samples it not the only benefit of a digital microscope.

In this blogpost, we will explain how to save photos from a camera microscope. It might even inspire you to go digital with your visual inspection processes after seeing the many ways a camera microscope can optimize your workflows.


How to take a photo on a camera microscope 

All you need to take a photo on a camera microscope is a control box.

When you’re done doing your inspections or find something worth documenting, you can capture an image by pressing the camera button in the top right corner of the control box. This button can be used no matter if you’re running software or simply using the microscope to magnify your sample.


Two kinds of photos

With a camera microscope, a photo is not just a photo. In fact, there’s two kinds of photos you can take:

  • A photo of what the microscope camera sees
  • A photo of what you see as a user, i.e. everything that camera sees plus the user interface


Saving what the camera sees is referred to as saving a photo without graphics, while including the user interface is referred to a saving a photo with graphics.

When saving with graphics, the photos will include any on-screen graphics at the time of capturing a photo, i.e. an open menu, current magnification level, app interface, etc.

This type of photo is useful if you want more information about the microscope settings used at the time of taking the photo. An alternative, however, is to use the Watermark app.  With the app, you can save a photo without graphics but add an info box in the bottom right corner that includes time and date, current magnification level, microscope serial number, etc.


How to access your photos

Now that you’ve taken your photos, there’s several ways to access them:

  • Via File manager:
    Saved photos are automatically available in the File manager. This features allows you to delete, rename and sort photos directly on the microscope. The photos can also be used as reference during future inspections.
  • On a flash drive:
    Photos saved on a flash drive can be accessed on a computer by transferring files from the flash drive to the computer or via the File manager on the microscope itself
  • Directly on the internal storage of the microscope:
    Photos saved here can also be accessed via the File manager but can also be accessed via computers on the same network as the microscope. This eliminates the need for transferring a flash drive back and forth between a computer and the microscope


3 tips that’ll take your documentation game to the next level

At this point, it should be clear that taking a photo on a camera microscope is a fast and easy process. But how you save and use your photos can also have a huge impact on your overall efficiency.

Let’s go through some of the key steps.


1. Different image file formats for different purposes

On a camera microscope, you have the option to save images in multiple formats: JPG, PNG, BMP and TIFF. The image format you choose will affect the size of the image but will also determine whether your photo contains EXIF data or not.

Photos saved as JPG will contain EXIF data on the brand and model of the microscope, date of capturing the photo, microscope serial number and field of view.


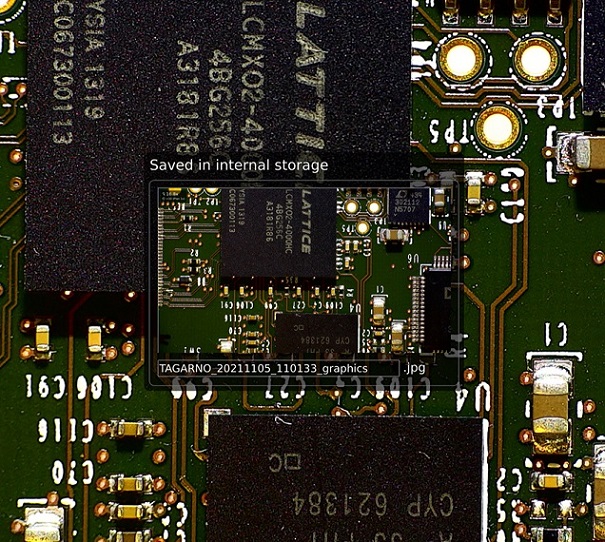
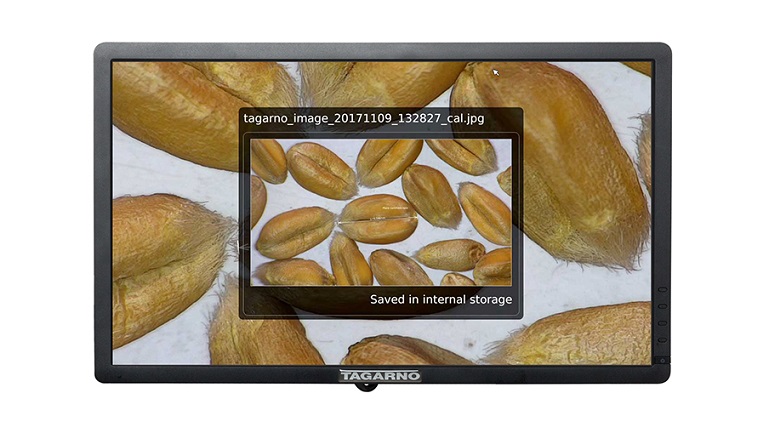
2. See your photo before you save it

It might not seem important, but sometimes it’s nice to see a preview of the photo you captured before saving it, e.g. to check if you saved a photo with or without graphics.

By being able to see a preview of your captured photos before saving them, you avoid having to open the photo in the File manager or on a separate computer and potentially realizing that the photo was saving with graphics when you intended to save without graphics or vice versa. Instead, the preview window allows you to detect any issues with the picture and easily retake another one immediately if needed.

Printscreen of seed

3. Naming and sorting your photos

By default, all images with be saved with the data and time of taking the picture as its name.
However, it might be beneficial to give the image a more descriptive name. Compared to capturing a photo on a smartphone through an ocular, you have the option of doing so directly on the microscope when saving the photo.

Another pro-tip is to define an image prefix before you start taking photos. This is useful if you’re inspection a specific batch of samples. Then, all photos within that batch will have the same image name followed by the date and time of capturing the photo. This makes sorting and identifying photos much easier.


In summary

For many businesses, it’s more and more important to capture images of their work. What many find, however, is that their magnification equipment is not suitable for this process.

Instead of introducing complicated workflows when it’s time to capture images (that might also result in the required images simply not being taken), changing to a camera microscope will not only make this process easier, but also introduce a variety of other opportunities to optimize your business in ways that are simply not possible on non-digital systems.

Get started with a digital microscope

Not sure which microscope you need? TAGARNO's digital microscopes can magnify from 4x-660x on a 24'' monitor.


What microscope you need will depend on your industry, if you want to use specialized apps to optimize your processes and if you need to document your work. Follow the link below to learn more.


Find the right microscope for you
CONTACT Get a quote
Get a quote

Fill out the form below to get in contact with the TAGARNO sales team. If you have a support question, please visit our Support page.

Talk to the team

You are also welcome to contact a person from the TAGARNO sales team directly

TAGARNO Head of Sales Western Europe Tina Snehøj Nielsen
Tina Snehøj Ravn Head of Sales Western Europe, Asia & Africa
TAGARNO USA Country Manager, Jake Kurth
Jake Kurth Country Manager Americas
You are now entering our German TAGARNO site Do you wish to continue?
No, stay here Yes, proceed