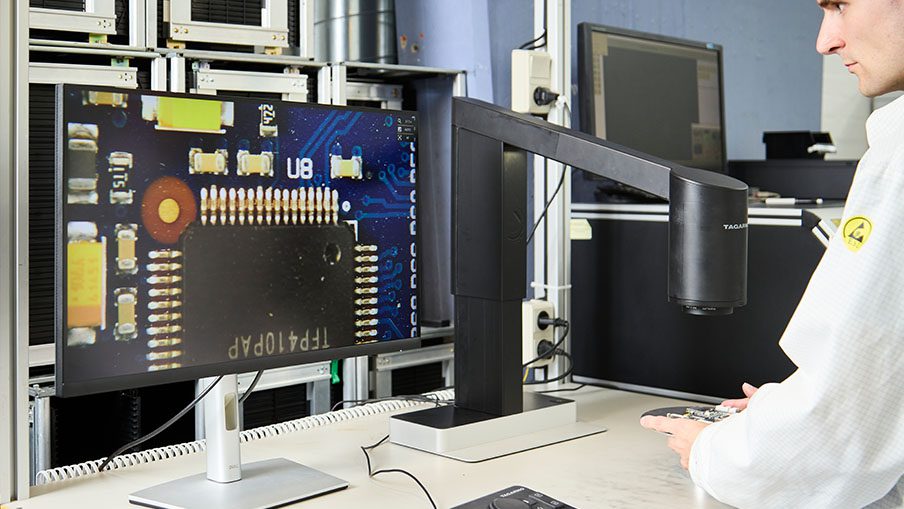
Over the shoulder shot of man using a digital microscope to inspect a PCBA and a headshot of Jake Kurth from TAGARNO at the bottom

GUIDE

Practical Tips for Bringing Digital Microscopy Into Existing Production

Are you considering digital microscopes for your inspections? Here's how others have saved real time, budget, and effort when taking the leap to digital inspections.

This article was originally written by Jake Kurth, Vice President of Technical Sales at TAGARNO USA, for Quality Magazine. The original article can be found here.

You can read the article in its entirety or use the links below to jump to the section most relevant for you.

This article will cover:

Introduction

Manual visual inspection processes play a major role at some point in most products’ life cycles across varied industries. Assembly, inspection, rework, and dozens of other tasks are performed daily by operators viewing products through eyepieces. Digital microscope systems offer an enormous amount of improvement for ergonomics, versatility, capability, and, as I’ve written before in my previous article for Quality Magazine, AI assistance.

However, before a quality or process improvement team can realize these benefits, some fundamental concepts need to be covered first. Over the years, TAGARNO has brought digital microscope systems into many manual visual inspection industries and there are lessons we’ve learned along the way that can save a team real time, budget, and effort in taking the leap to digital inspections.

First Considerations Before Choosing Your Next Digital Microscope

Before evaluating any particular digital microscope system, it’s worth taking a moment and reviewing a few fundamental topics:

Define the purpose of digital up front.

What is the actual objective of going digital? Is it ergonomics, throughput, documentation, remote collaboration, training, or a future AI initiative? What workflows are you actually looking to integrate into? A clear answer to this question helps everything that follows.

Image quality is the foundation.

A digital microscope needs to do more than simply produce a digital image; it needs to produce a quality digital image that can fundamentally resolve the object being inspected and with enough contrast to see differences. A high-resolution sensor behind a mediocre optical path with poor lighting will still give you a mediocre image. If the optics can’t resolve the feature in question, no amount of processing, AI or otherwise, will fix that. This is especially true when replacing magnifying viewers or existing stereomicroscope systems. There is going to be a certain level of quality that needs to be achieved before all else. I like to ask my customers to think about what is the smallest feature that needs to be resolved. What level of detail are you looking for? What type of features can we exploit with lighting contrast techniques?

Field of view is the common language for all magnified viewing.

Many industries have quality control standards or processes written around a specific magnification factor, usually with 10x eyepieces included in the specification if coming from a stereomicroscope inspection process. For example, in electronics manufacturing, an IPC standard of 4x inspection can be a starting point for conformal coating inspection. Digital microscope systems do not have eyepieces, and the full system magnification compared to the real object depends on the monitor being used. A 24” monitor, for example, may display 4x at a specific zoom setting, whereas that same zoom setting on a 48” monitor is now 8x! When moving to a digital system, it’s important to think in terms of field of view rather than magnification alone. If you are working to keep a magnification standard specification, match the field of view of the current standard.

Practical working distance considerations.

It’s also important to consider your working distance requirements at this point. If you have established your image quality requirement and field of view requirement, but cannot optically get the working distance to work out for your part, you may need to lean on software like image stitching to assist, or reconsider the inspection approach entirely. Fundamentally, working distance is tied to optical resolution, so it is a balancing act, but usually there is a balance point of working distance and image quality that can be met.

Man using a digital microscope to inspect PCBAs
Working from a monitor lets operators sit or stand upright instead of leaning over eyepieces. When replacing a stereomicroscope, match the field of view rather than the magnification.

Stereopsis: When It’s Needed, and When It’s Not

A misunderstood aspect of moving from an analog stereomicroscope or ring magnifiers to a digital system is stereopsis, or true binocular depth perception. Most traditional inspection methods have it, but it isn’t always necessary. Clarifying if the application truly needs stereopsis is worth asking early, because getting it wrong can be expensive.

I worked with a customer who had been working on a custom software solution before discovering late in the project that operators simply could not use it: the application required stereo vision and the solution they had built around did not provide it. That project had to be reworked from the ground up, essentially going back to the drawing board. Especially for customers considering automation and/or AI approaches, before any custom development begins, it’s important to test or try out the inspection first. It’s in part why we lean so heavily on demonstrating physical equipment directly in the hands of operators early in our sales process.

This all said, not every application requires true stereopsis. Take fine soldering under a footswitch-controlled system at magnification with autofocus, for example. At first glance, it may be assumed that this application requires stereopsis. However, at higher levels of magnification, the depth of field becomes so narrow that the operator is effectively working in a single optical plane at any given moment; depth perception ends up being conveyed naturally, even without binocular stereo vision, because the narrow depth of field itself tells the operator where they are in space. What we have found is that many applications don’t require true stereopsis to provide a benefit from a digital microscope system; so long as the benefits to the inspection outweigh the loss of stereopsis. Stereopsis needs to be evaluated task by task, not assumed as a blanket requirement.

Over the shoulder shot of man fine soldering underneath a digital microscope while looking at his work on a monitor
Fine soldering under a digital microscope. At higher magnification, the narrow depth of field shows the operator where they are working, even without stereo vision.

Operators Are the Fundamental Linchpin for Any Manual Visual Process

No matter how good the optics or the software, the operator is still the linchpin of any manual visual process. When moving to a digital microscope from a traditional magnification system, you may risk taking away a set of instincts and techniques operators have built up over years. The trick here is to ask, “Beyond going digital, what can I give the operator that complements their process with the digital microscope?”

I personally always point to the footswitch. Our most successful implementations have been the ones where the operators themselves become advocates for the transition because the digital microscope enhances what they’re able to do, rather than just changing how they do it. A great example was a customer who had a very manual inspection project where they had an operator who had steadfastly refused to consider the digital microscope solution the quality engineer was providing the operator; until we introduced them to our footswitch. This allowed them the freedom to use their feet to adjust magnification and focus in real time, all without taking hands off the part. This operator in the end became a large proponent of our system and the newly improved QC process, telling us and others that we had given them a “third arm”.

Some of the tools that have made the biggest difference for operators making this transition include:

  • Laser pointer:

Allows an operator or a supervisor to instantly orient a colleague to a specific feature on a sample at magnification, without needing to physically point at something under an eyepiece or describe a location verbally.

  • Presets:

Allows setting presets for all aspects of the inspection from magnification to lighting conditions.

  • Near-infrared (NIR) visualization:

Reveals detail that isn’t visible under standard white light, which is valuable for certain materials, coatings, and defect types that operators wouldn’t otherwise be able to see at all.

  • Fluorescence sensitivity:

Opens up inspection capabilities such as contamination, adhesive coverage, and material verification that go beyond what any traditional optical microscope offers.

  • Footswitch:

Keeps an operator’s hands free to manipulate the part while capturing images, freezing frames, or triggering measurements, which matters enormously for repetitive, high-volume tasks.

  • Autofocus:

Reduces fatigue and speeds up inspection cycles, particularly for operators moving quickly across parts with varying surface heights.

  • Ergonomics:

Removing the requirement to hunch over an eyepiece for an entire shift is one of the most immediate, tangible benefits operators notice, and it’s often the single biggest driver of buy-in.

  • Observation separated from the eyepiece:

Being able to view the sample on a screen rather than through an eyepiece opens up entirely new working environments — laminar flow hoods being one common example — where a traditional microscope simply couldn’t be used at all.

Taken individually, none of these is a silver bullet. Taken together and matched to the specific task in front of the operator, they’re what turns a digital microscope from a like-for-like replacement into a genuine upgrade; and that upgrade is what earns operator buy-in, which in turn is what makes any digital transition, and any improvement initiative that follows it, actually succeed.

Two operators using a digital camera microscope to collaborate
Two colleagues review the same magnified image together; something that is not possible when only one person can look through the eyepieces.

Bringing It Together

Making the switch to digital microscopy is rarely just a hardware purchase. It’s a re-evaluation of image quality requirements, field of view versus magnification, the engineering objective behind the change, and whether stereopsis is genuinely needed for the task at hand. Most importantly, it’s a re-evaluation of what the operator needs to do their job as well as, or better than, they could before. Get those fundamentals right, and the path toward more advanced capabilities, including visual AI, becomes a natural next step rather than a leap of faith.

There’s more to read

Now that you’ve made it to the end of this guide, here are a few other blogposts that you might find interesting.

CONTACT Get a quote
Get a quote

Fill out the form below to get in contact with the TAGARNO sales team. If you have a support question, please visit our Support page.

Talk to the team

You are also welcome to contact a person from the TAGARNO sales team directly

Portrait photo of Paul Ashton, Sales Director at TAGARNO
Paul Ashton Sales Director EMEA & APAC
TAGARNO USA Country Manager, Jake Kurth
Jake Kurth Vice President of Technical Sales Americas
Ondrej Chrappa, Regional Sales Manager, at TAGARNO in black polo t-shirt in front of grey wall
Ondrej Chrappa Regional Sales Manager DACH
You are now entering our TAGARNO site Do you wish to continue?
No, stay here Yes, proceed